Installation
Sandwich Steam is a source plugin. That means Unreal has to compile it once on your computer. This sounds scary, but for most people it is: install a free tool, click “Yes” on a dialog, wait a few minutes.
- Which path is mine?
- Step 0: install a compiler (Windows)
- Step 1: get the plugin
- Step 2: put it in your project
- Path 1: Blueprint project
- Path 2: C++ project
- Path 3: build the plugin once and reuse it
- Check that it worked
- What gets enabled automatically
- Updating
Which path is mine?
| My project is… | Use |
|---|---|
Blueprint only (no Source folder, nothing to do with C++) | Path 1 |
A C++ project (has a Source folder and a .sln or Rider setup) | Path 2 |
| I want one build I can reuse in many projects | Path 3 |
You need Unreal Engine 5.6, 5.7 or 5.8. Each engine version ships its own Steamworks SDK; see Supported engine versions.
Step 0: install a compiler (Windows)
Skip this if you already build C++ projects.
- Install Visual Studio (the free Community edition is fine). Use the Visual Studio version that Epic lists for your engine version in their setup guide.
- In the Visual Studio Installer, tick the workload Game development with C++.
- In the right-hand Installation details list, also tick Unreal Engine installer and Unreal Engine test adapter if they are not already ticked.
- Click Install and wait. It is a big download.
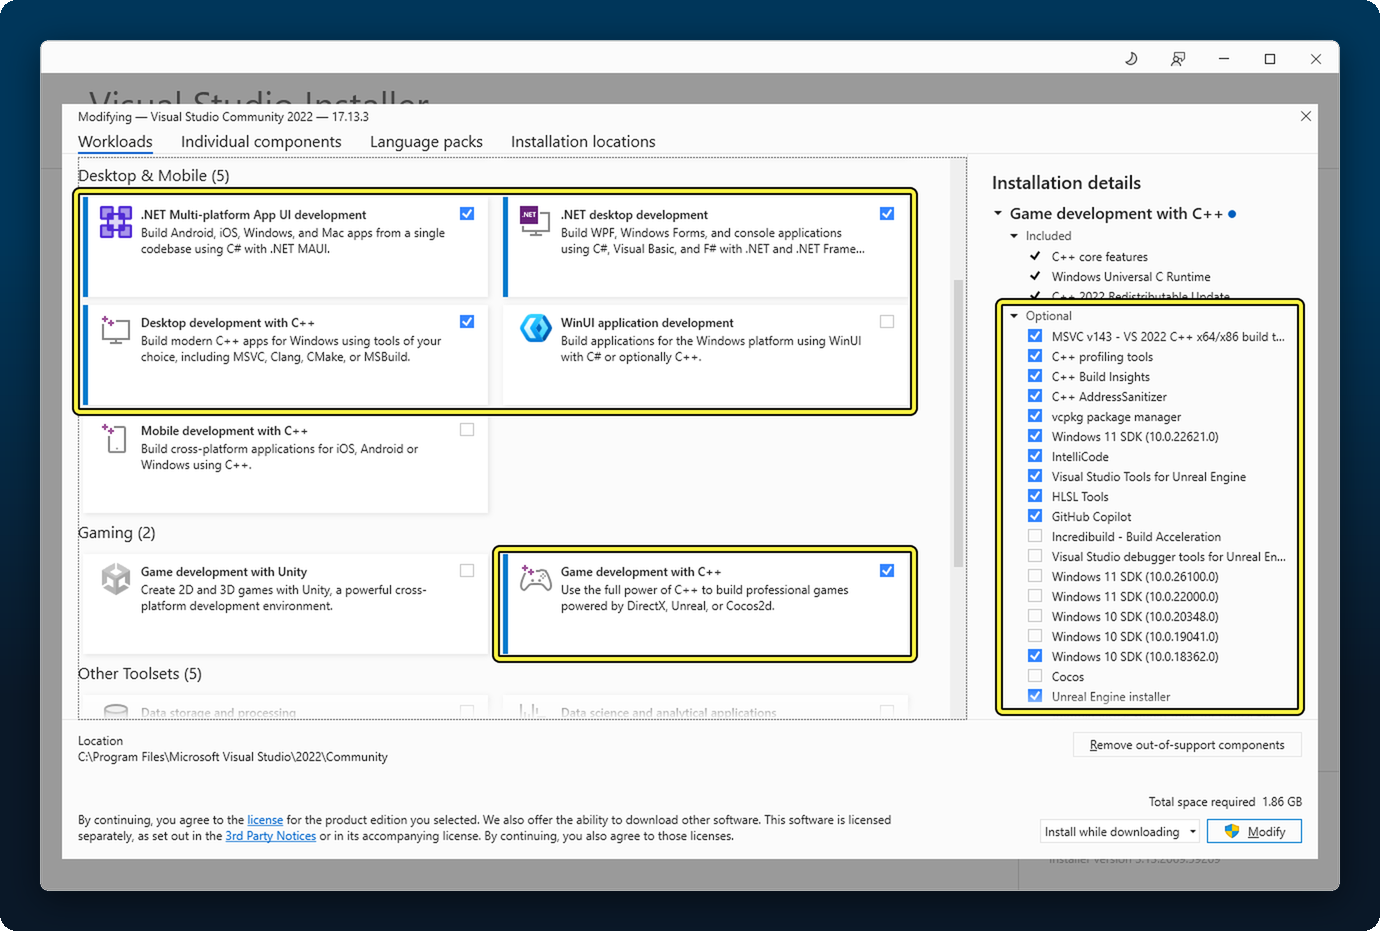
Screenshot from Epic’s guide Setting up Visual Studio for Unreal Engine, which explains every option.
Why? Unreal needs a compiler to turn the plugin’s source code into something it can run. You will never open Visual Studio yourself in Path 1. Unreal uses it in the background.
macOS / Linux: the plugin is written for them but has never been run there. You are welcome to try, and to tell us how it went in an issue. On a Mac, the Steam overlay only works when the game is launched through the Steam client: add the build with Add a Non-Steam Game to My Library and start it from there.
Step 1: get the plugin
Option A: download (easiest).
- Open the repository page.
- Click the green Code button, then Download ZIP.
- Unzip it. You will get a folder named
SandwichSteam-main.
Option B: git.
git clone https://github.com/SandwichCakeStudios/SandwichSteam.git
Step 2: put it in your project
- Open your project folder (the one with the
.uprojectfile). - If there is no
Pluginsfolder, create one. - Copy the plugin folder in and rename it to exactly
SandwichSteam. The fileSandwichSteam.upluginmust sit directly inside it.
YourProject/
├─ YourProject.uproject
├─ Content/
└─ Plugins/
   └─ SandwichSteam/
      ├─ SandwichSteam.uplugin     <-- must be here
      ├─ Source/
      ├─ Config/
      └─ Resources/
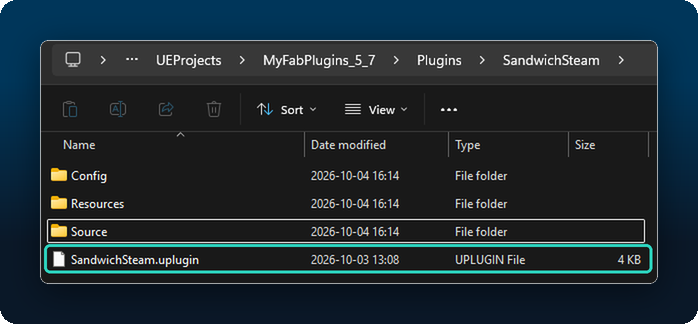
Common mistake: a double folder like
Plugins/SandwichSteam-main/SandwichSteam/SandwichSteam.uplugin. Unreal will not find the plugin. Move the inner folder up one level.
Path 1: Blueprint project
You have done Steps 0 to 2. Now:
- Double-click your
.uprojectto open the project. -
Unreal shows a dialog: “Missing Modules: The following modules are missing or built with a different engine version… Would you like to rebuild them now?” Click Yes.
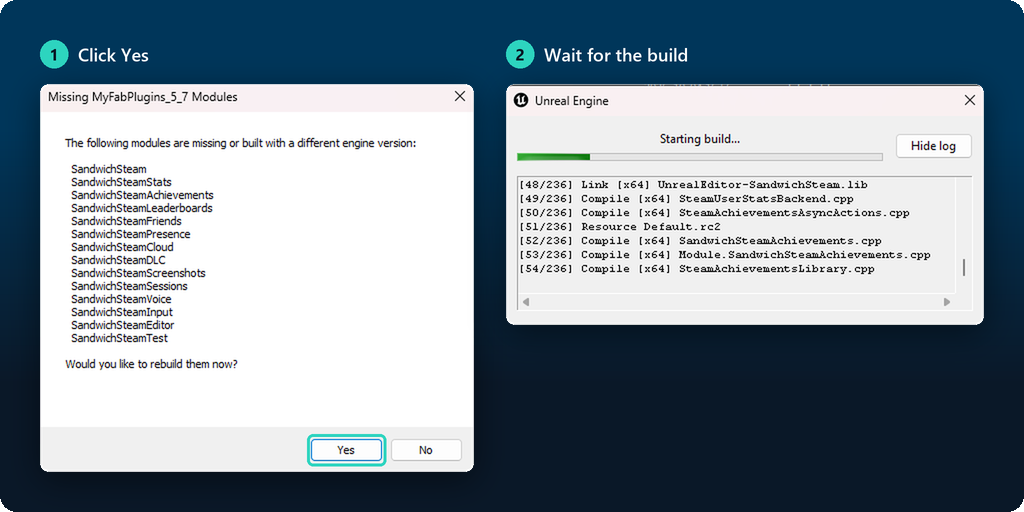
- Wait. The first build takes a few minutes. The editor opens when it is done.
- Go to Check that it worked.
The dialog says the build failed? See Troubleshooting. The most common cause is a missing Visual Studio workload (Step 0).
Path 2: C++ project
- Do Steps 1 and 2.
-
Right-click your
.uprojectand choose Generate Visual Studio project files.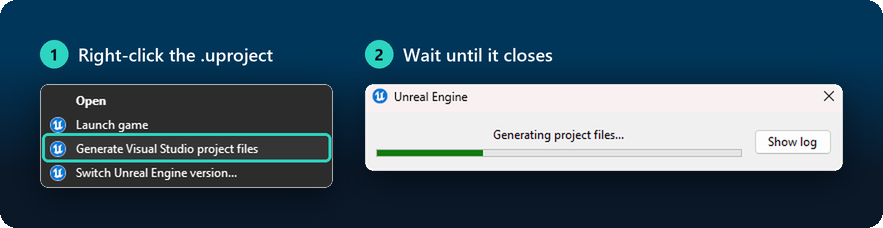
-
Open the
.slnand build your editor target (Development Editor, Win64) as usual: Build > Build YourProject. Wait for1 succeededin the Output window. Rider users: open the.uprojectand build from there.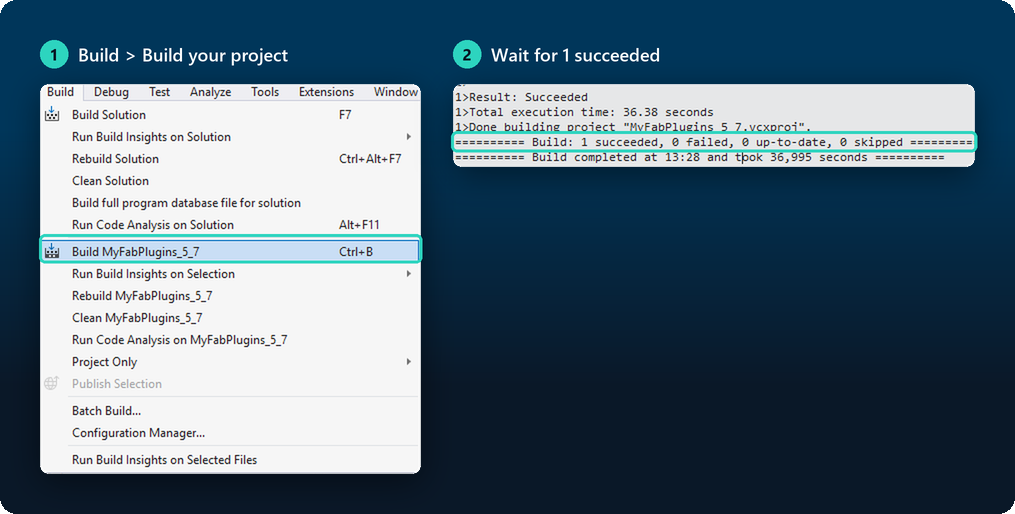
- To call the plugin from your own C++, add the modules you use to your
YourProject.Build.cs:
PublicDependencyModuleNames.AddRange(new string[]
{
    "SandwichSteam",              // core (always needed)
    "SandwichSteamStats",         // only add the ones you use:
    "SandwichSteamAchievements",
});
| Module | Feature |
|---|---|
SandwichSteam | Core: User, Utility, Overlay, settings, App Definition |
SandwichSteamStats | Stats |
SandwichSteamAchievements | Achievements (needs SandwichSteamStats) |
SandwichSteamLeaderboards | Leaderboards |
SandwichSteamFriends | Friends |
SandwichSteamPresence | Rich Presence |
SandwichSteamCloud | Cloud saves |
SandwichSteamDLC | DLC |
SandwichSteamScreenshots | Screenshots |
SandwichSteamSessions | Sessions and lobbies |
SandwichSteamVoice | Voice chat |
SandwichSteamInput | Steam Input |
SandwichSteamEditor | Editor tools (editor only, you never reference it) |
SandwichSteamTest | In-game test panel (development builds only) |
Don’t need a feature? Delete its folder under
Plugins/SandwichSteam/Source/and its entry inSandwichSteam.uplugin, then regenerate project files. Nothing else depends on it, except that Achievements needs Stats.
Path 3: build the plugin once and reuse it
Do this if you want the same compiled plugin in several projects, or you do not want each project to compile it. You still need the compiler from Step 0.
Open a terminal and run (adjust the paths to your install):
"C:\Program Files\Epic Games\UE_5.8\Engine\Build\BatchFiles\RunUAT.bat" BuildPlugin ^
  -Plugin="C:\Path\To\SandwichSteam\SandwichSteam.uplugin" ^
  -Package="C:\Builds\SandwichSteam" ^
  -TargetPlatforms=Win64
When it says BUILD SUCCESSFUL, copy C:\Builds\SandwichSteam into any project’s Plugins folder (or into UE_5.8\Engine\Plugins\Marketplace to make it available to all projects). Those projects no longer need to compile it.
The result only works with the engine version and platform you built it for.
Check that it worked
-
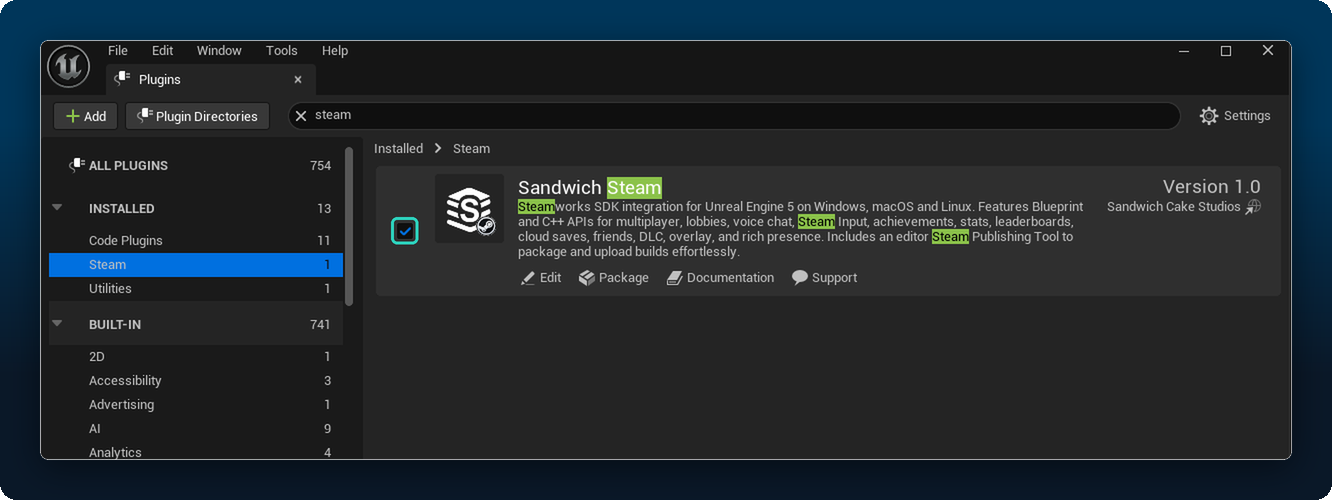
Open the editor. Go to Edit > Plugins, search for Sandwich Steam. It should be ticked. If not, tick it and restart.
-
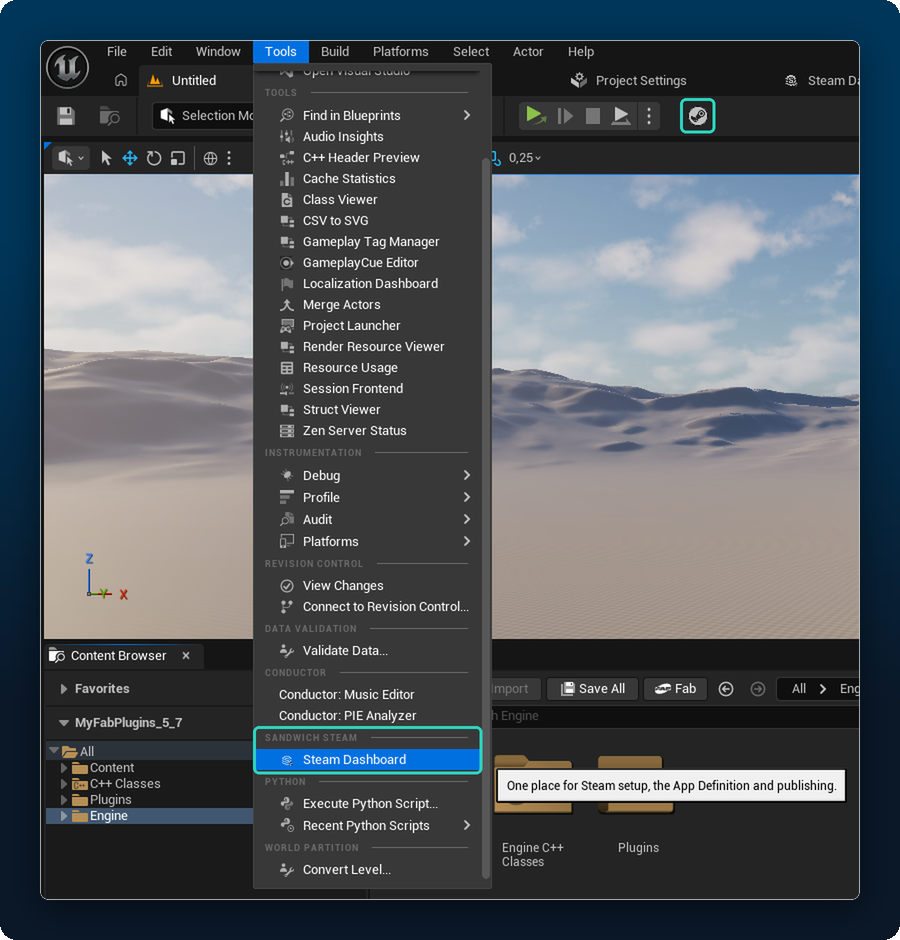
Open the Tools menu. In its Sandwich Steam section you should see Steam Dashboard. The Steam button in the editor toolbar opens the same dashboard.
-
Right-click in any Blueprint and search for
Steam. You should see nodes such as Unlock Steam Achievement.
Installed. Next: Quick Start: your first achievement.
What gets enabled automatically
Sandwich Steam uses Unreal’s own Steam support, so it switches on these engine plugins for you: Online Subsystem, Online Subsystem Utils, Online Subsystem Steam and Steam Sockets. You do not need to download the Steamworks SDK. Enhanced Input is used for push to talk and Steam Input if you have it enabled.
Updating
Close the editor, replace the Plugins/SandwichSteam folder with the new version, delete the project’s Binaries and Intermediate folders (they are rebuilt automatically) and reopen the project.