Quick Start: your first achievement in 10 minutes
By the end of this page you will have unlocked a real Steam achievement from a Blueprint, using Valve’s free test app Spacewar, without buying anything.
- Before you begin
- 1. Open the Steam Dashboard
- 2. Set the App ID
- 3. Let the plugin configure the project
- 4. Create your App Definition
- 5. Import the achievements from Steam
- 6. Unlock it from a Blueprint
- 7. Run it
- You did it! What next?
- Useful console commands
Before you begin
- Sandwich Steam is installed and the editor is open.
- The Steam client is running and you are logged in.
- You will test with Play > Standalone Game. Steam does not work in Play In Editor; if you press the normal Play button, every Steam node will just report Unavailable.
What is Spacewar? App ID
480is a public Valve test game that any Steam account can run. It lets you try everything before you own a Steam page. When you have your own App ID, you swap the number and re-run the steps.
1. Open the Steam Dashboard
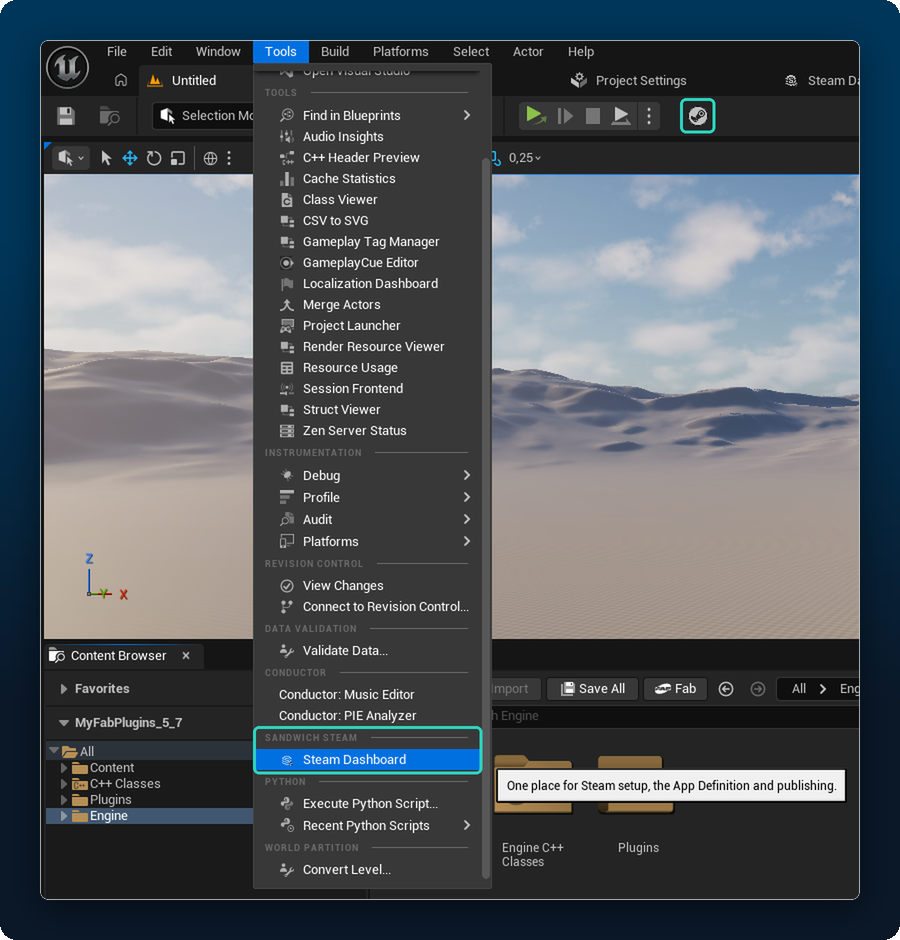
Open the Tools menu and click Steam Dashboard (in the Sandwich Steam section), or click the Steam button in the editor toolbar.
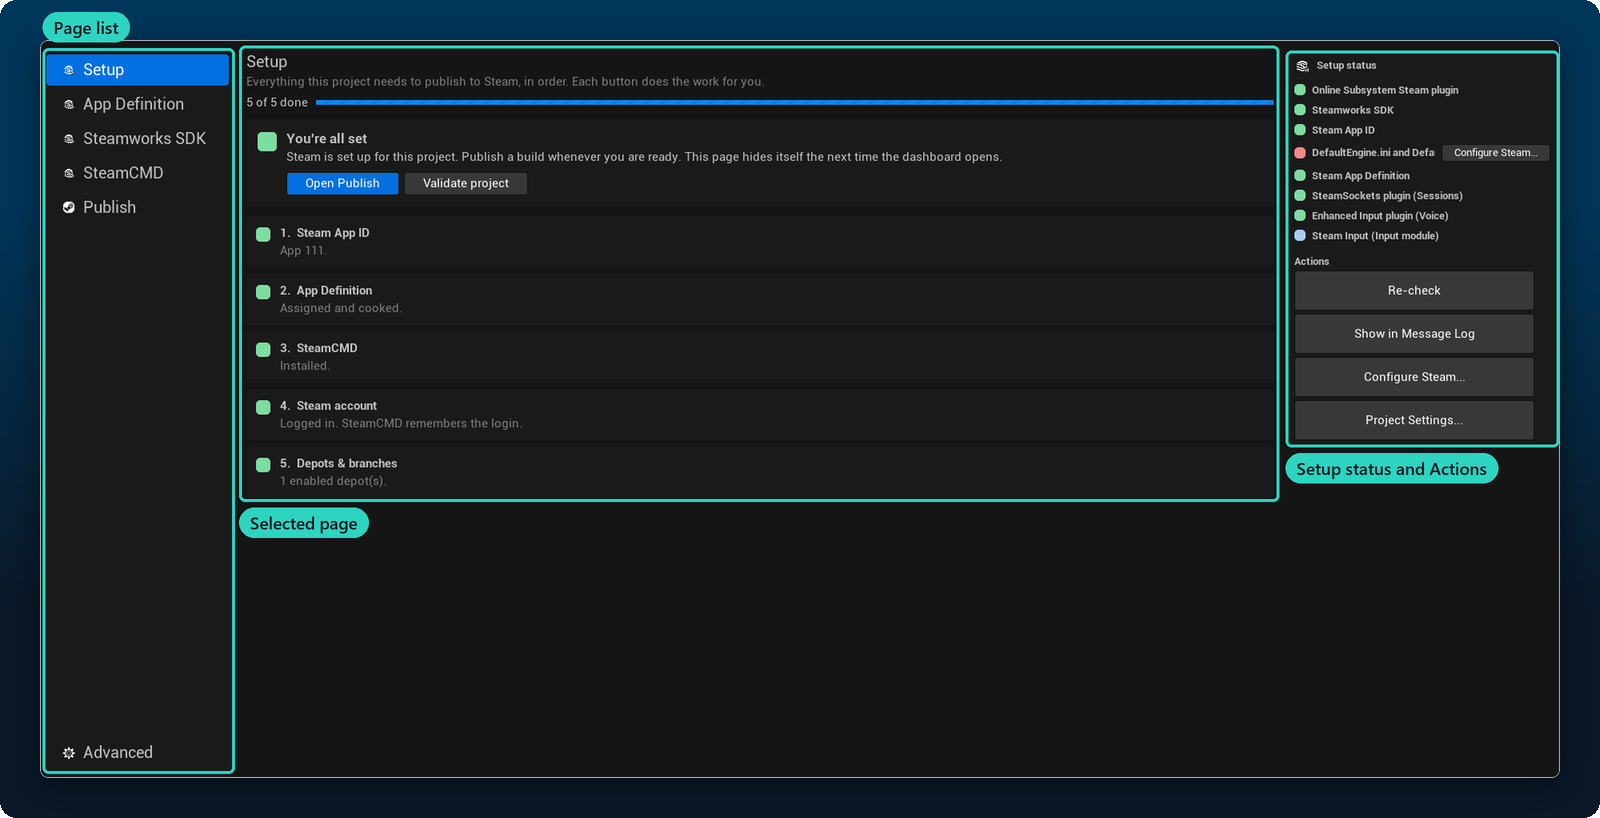
The dashboard has three parts: a page list on the left, the selected page in the middle, and on the right a Setup status card with a coloured dot per check, plus an Actions card. Red means “fix me”. Hover a row to read the full explanation. Our goal is to get everything green.
2. Set the App ID
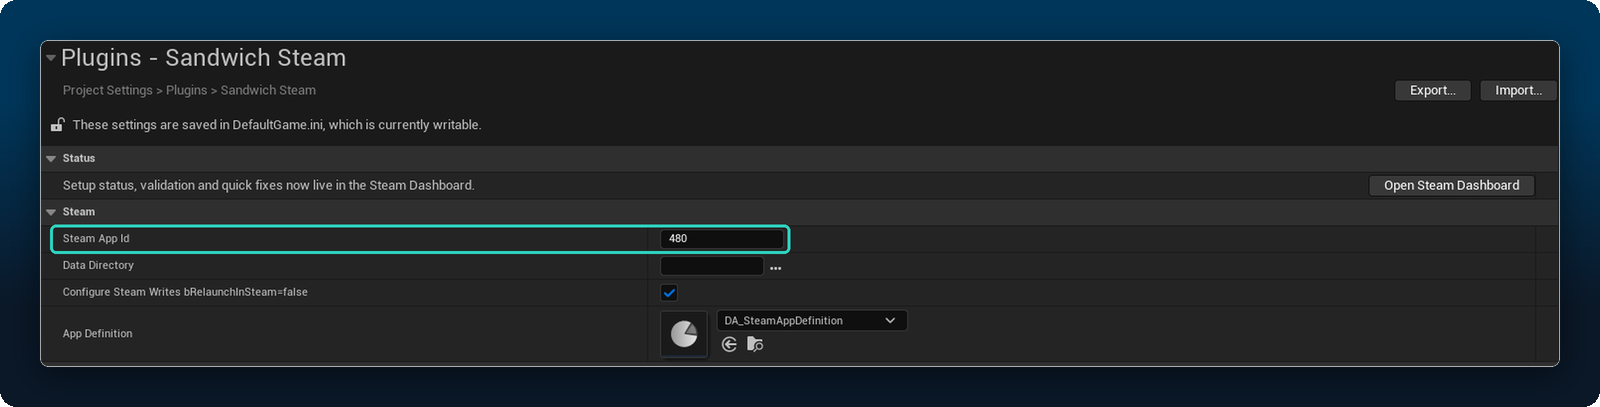
- In the dashboard’s Actions card, click Project Settings…. It opens Project Settings > Plugins > Sandwich Steam.
- Set Steam App ID to
480.
3. Let the plugin configure the project
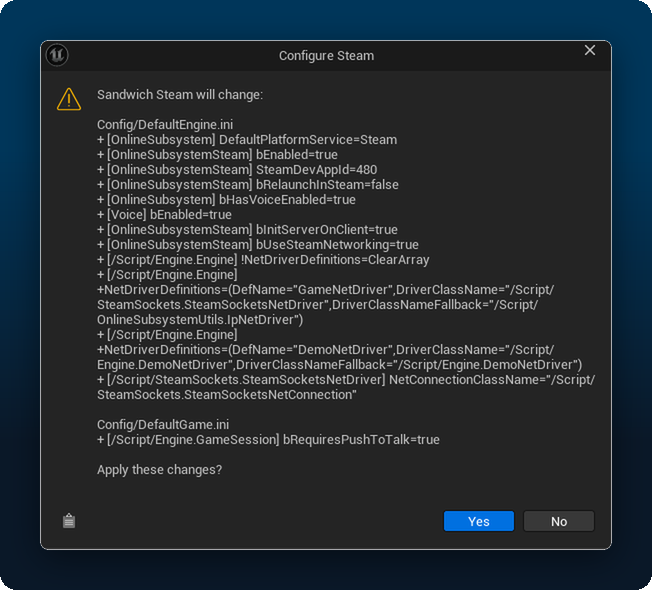
Steam needs a few lines in your project’s DefaultEngine.ini. You do not have to type them.
- Back in the dashboard, click Configure Steam….
- A window lists every change before anything is written. Read it, then confirm.
You do not need to create
steam_appid.txt. When you run Standalone or a Development build, Unreal writes it next to the running executable and deletes it when the game exits. If Steam still does not recognise your game, see the dashboard’s Advanced page. The Publish Tool always leaves the file out.
Optional network tuning. The dashboard’s Advanced page can also write higher bandwidth caps and a connect timeout for SteamSockets sessions (off by default). It writes
MaxClientRate,MaxInternetClientRate,InitialConnectTimeout,ConfiguredInternetSpeedandConfiguredLanSpeedintoDefaultEngine.ini, andTotalNetBandwidth,MaxDynamicBandwidthandMinDynamicBandwidthintoDefaultGame.ini. The values are starting points; set them for your game.
4. Create your App Definition
The Steam App Definition is one small asset that lists your game’s stats, achievements, leaderboards and so on. It is what makes the dropdowns in Blueprint nodes work.
- In the dashboard, stay on the Setup page. It lists everything in order.
- Under 2. App Definition, click Create & assign. This creates
Content/Steam/DA_SteamAppDefinitionand assigns it in the settings for you. (The Create and assign button in the Setup status card does the same.)
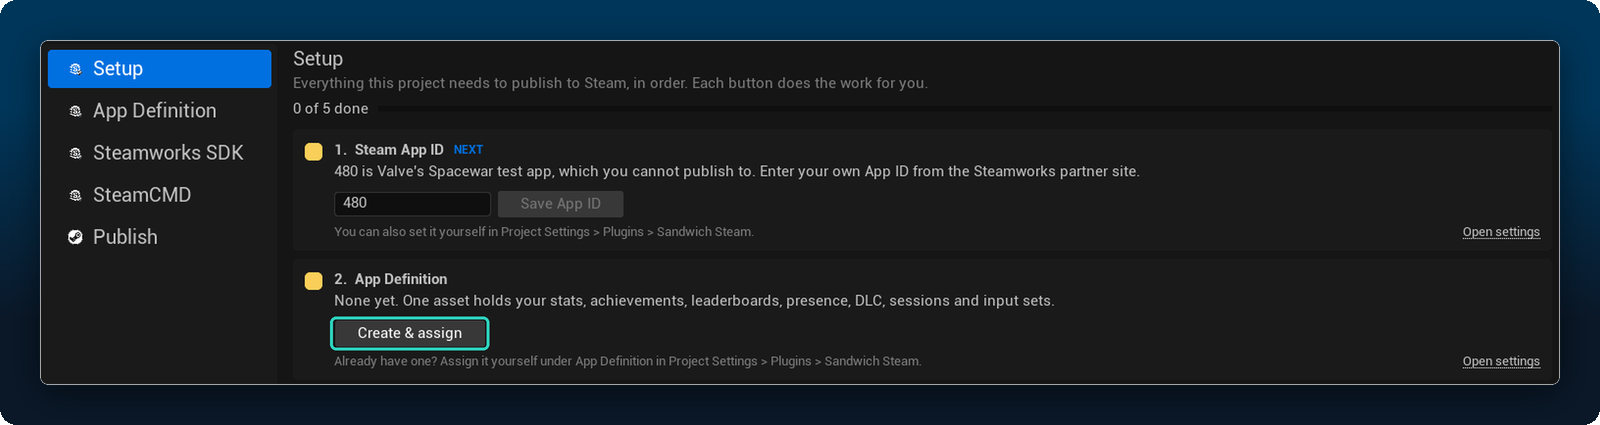
Click Re-check. The Setup status rows should now be green. Spacewar (480) shows an info row saying you use the test app. That is expected.
5. Import the achievements from Steam
Steam knows which achievements Spacewar has. You can pull them into your App Definition instead of typing them.
- Press Play > Standalone Game.
- In the running game, press the ~ key and enter
Steam.Debug.Show. A debug panel appears. - Scroll down in the panel to the Stats section, click Export schema for the editor importer, then close the game.
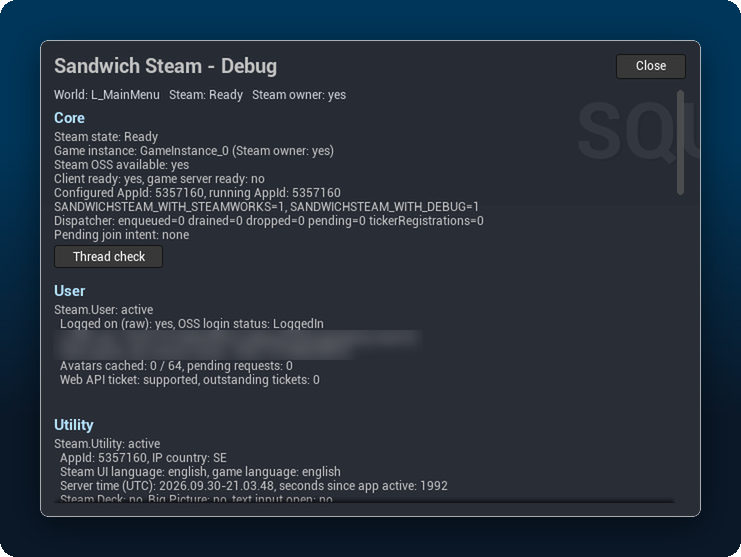
Without the panel: type
Steam.Stats.ExportSchemain the console instead. It writes the same file.
- In the editor’s dashboard, on the App Definition page, click Import from Steam….
- When asked whether to create gameplay tags, click Yes. You get one tag per achievement, like
Steam.Achievement.<Name>.
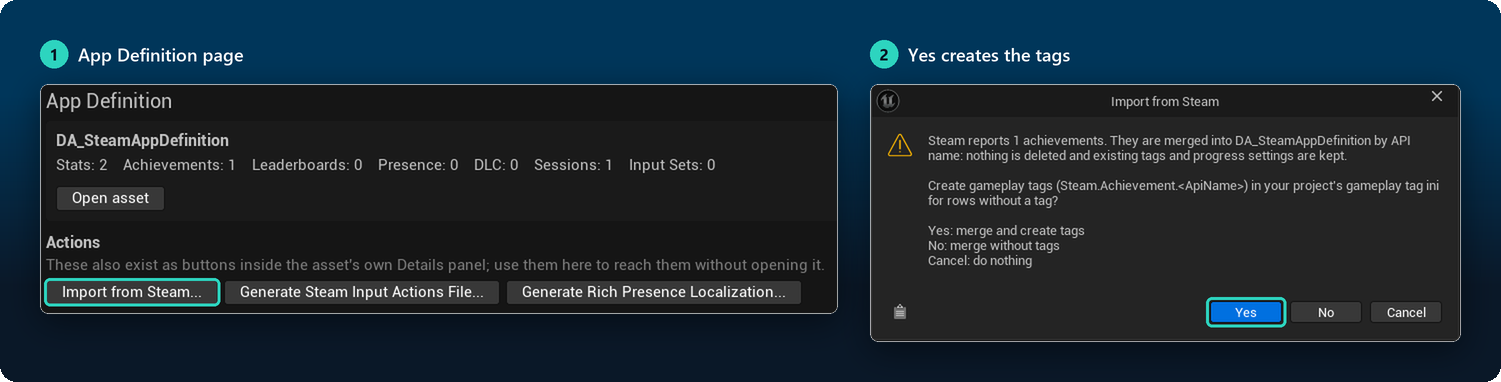
- Save the App Definition asset.
Nothing to import? Make sure you ran the export from a Standalone game with Steam running, and that the App ID was
480at that time.
6. Unlock it from a Blueprint
- Open your level’s Level Blueprint (or any Blueprint that runs in the game).
- Right-click on the graph and search for Unlock Steam Achievement.
- Connect it where the achievement should unlock. For this test, Event BeginPlay is fine.
- Click the achievement dropdown and pick one of the tags you just created.
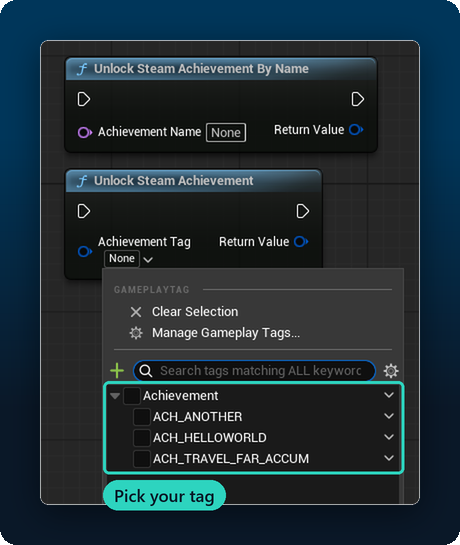
- Compile and Save.
7. Run it
- Press Play > Standalone Game.
- Watch the bottom-right corner of your screen. Steam shows its achievement pop-up.
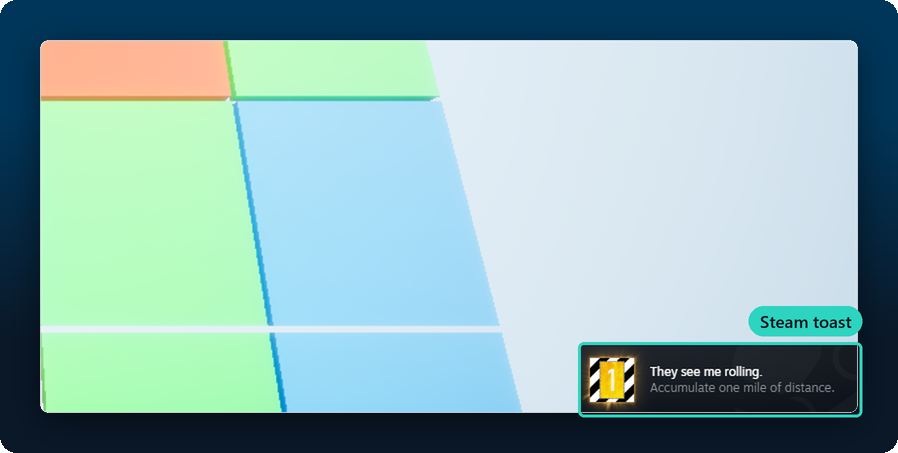
No pop-up? Open the console (~) and type Steam.Achievements.Dump. It prints every achievement and whether it is unlocked.
Want to test it again? An unlocked achievement stays unlocked. In a development game, type Steam.Achievements.Clear <ApiName> to lock it again.
You did it! What next?
- Try every feature without writing anything: in a Standalone game type
Steam.Test.Toggle. The test panel has one page per feature with buttons and live values.
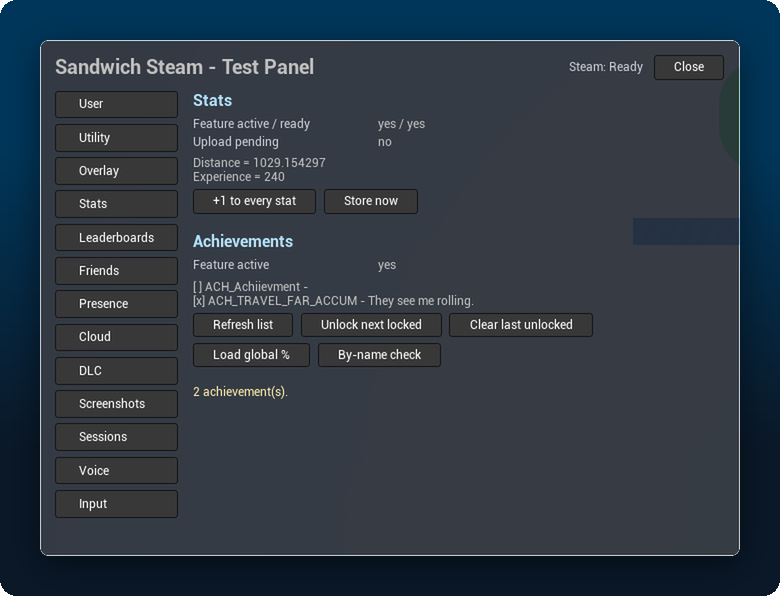
- Something went wrong? Troubleshooting.
- Feature guides for stats, leaderboards, sessions, voice and more are coming.
- Ready for your own game? Get an App ID in the Steamworks partner site, put it in the settings instead of
480, and repeat steps 3 to 5. - Ready to upload a build? Publishing to Steam packages and uploads from the dashboard.
Useful console commands
Run them in a Standalone or development game (open the console with ~).
| Command | What it does |
|---|---|
Steam.Debug.Show | Live debug panel with buttons for every installed feature |
Steam.Test.Toggle | The test panel |
Steam.Core.Dump | Overall Steam state. Include this in bug reports |
Steam.Stats.Dump | Stats state and values |
Steam.Achievements.Dump | Every achievement and whether it is unlocked |
Steam.Achievements.Unlock <ApiName> | Unlock one from the console |